This article shows how to enable a maintenance page in Nginx over HTTP and how to test such Nginx configuration with the Bats testing framework.
Introduction
Whenever possible avoid downtime!
However sometimes it just happens so that we need to take our service offline for at least a few minutes of maintenance. To be able to act professionally in such situations we can configure Nginx, the popular web server to show a special maintenance page for all incoming requests. This page will inform users and search engine bots that our site is temporary down and will be back soon.
There is a really great article about effective maintenance pages with a bunch of tips which allow you to design the perfect maintenance page for your service. Proper communication is as important as a stable technical integration.
Let’s quickly go through our plan for today.
Our initial situation is presented on the diagram below.

For the sake of simplicity I have chosen the simplest scenario - one web application behind an Nginx server. The implementation for a more complex infrastructure is analogous and should be as simple as the one presented in this article. But if you have any troubles feel free to contact me. I’m sure I will be able to help.
And here comes the best part. With a simple HTTP PUT request we can enable the Nginx’s maintenance mode.
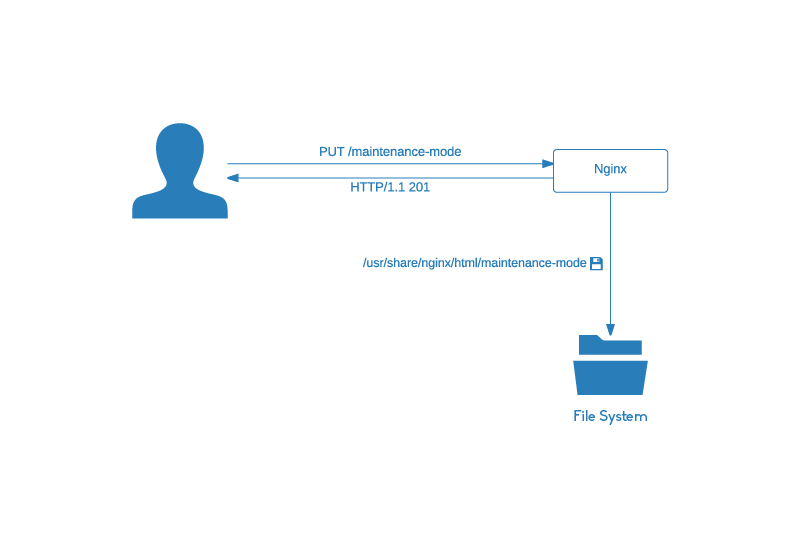
From now on all responses will contain the content of the /usr/share/nginx/html/maintenance.html file and will be returned with the 503 status code.
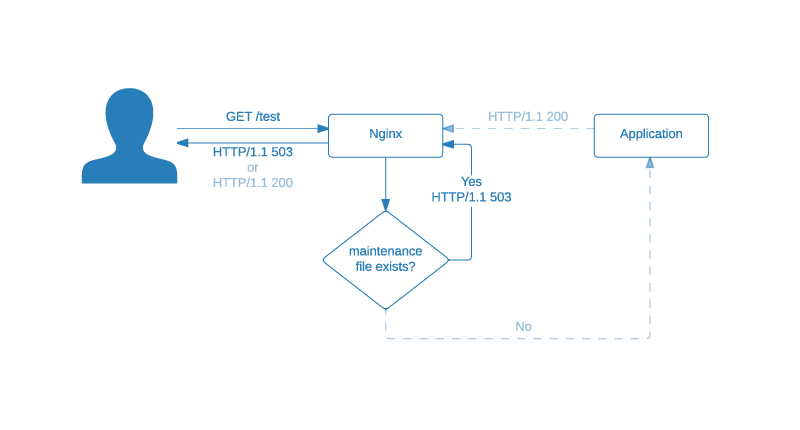
For the full understanding the diagram above contains also the light blue path which represents the normal situation.
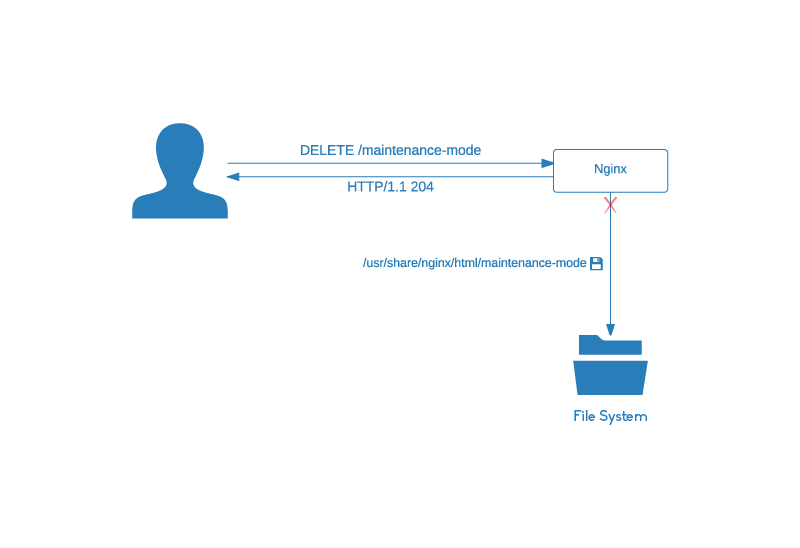
The maintenance mode persists until we disable it with an HTTP DELETE request.
Now for a better overview let’s see everything at once. The following sequential diagram shows the full situation described in this chapter:

In this diagram the HTTP PUT and DELETE requests are fetched by the same client for the sake of simplicity. In a real world those requests are only available to the appropriate person/service.
Preparation and Infrastructure
The source code for the example presented in this article is available in the 0.0.1 release of my Nginx Configuration Examples Github project.
Simply clone the git repository with this command:
git clone --branch 0.0.1 git@github.com:czerasz/nginx-configuration-examples.gitThe project structure looks like this:
.
├── bin
│   └── test.sh
├── config
│   ├── htpasswd
│   ├── maintenance-page.conf
│   └── nginx.conf
├── Dockerfile
└── test
    └── nginx.bats
It contains:
- a helper script inside the
bindirectory - few Nginx configuration files in the
configdirectory - test specs and a
Dockerfile
To be able to follow this tutorial you will just need Docker installed on your machine. Follow this installation guide if you haven’t installed Docker so far.
The Dockerfile
We will work on and test our Nginx configuration inside a Docker container. This will allow us to keep everything inside a sandbox additionally providing a really fast environment.
The mentioned Docker container is created based on the following Dockerfile:
 1 FROM nginx:1.7.9
 2
 3 # Set the reset cache variable
 4 ENV REFRESHED_AT 2015-04-20
 5
 6 # Update repositories lists and install required tools and libraries
 7 RUN apt-get update
 8 RUN apt-get install -y wget curl git tree vim htop strace procps
 9
10 # Install bats testing framework
11 RUN git clone https://github.com/sstephenson/bats.git /tmp/bats && cd /tmp/bats && ./install.sh /usr/local
12
13 # Create maintenance content file - this will be returned in maintenance mode
14 RUN echo 'Site in maintenance' > /usr/share/nginx/html/maintenance.html
15
16 # Nginx owns the web content directory - required to save the maintenance file by WebDAV
17 RUN chown -R nginx:nginx /usr/share/nginx/html/
18
19 # Add configuration files
20 ADD ./config/nginx.conf /etc/nginx/nginx.conf
21 ADD ./config/maintenance-page.conf /etc/nginx/maintenance-page.conf
22
23 # Add the base auth credentials
24 ADD ./config/htpasswd /etc/nginx/htpasswd
25
26 # Add test spec
27 ADD ./test/nginx.bats /
The Dockerfile should be straight forward because it’s well documented, but here are some things which are worth mentioning:
- the line with
ENV REFRESHED_AT 2015-04-20is explained in my other article which is available here - the installed
procpspackage (the/procfile system utilities) containspsandpgrepamong many other useful tools.pgrepis used later in our Nginx test catalogue - in line
11Docker will install the Bats: Bash Automated Testing System. It’s a simle and easy to use Bash testing framework - the
/usr/share/nginx/html/maintenance.htmlcontains the maintenance information. If you want to add a nice looking page feel free to use theADDdirective
Nginx Configuration
The config/nginx.conf is the main Nginx configuration file which includes the most important file for us, mainly the config/maintenance-page.conf.
Let’s go through the config/maintenance-page.conf file:
set $maintenance '';

location /maintenance-mode {
    limit_except PUT DELETE {
        deny all;
    }
    dav_methods PUT DELETE;

    auth_basic "Maintenance";
    auth_basic_user_file /etc/nginx/htpasswd;
}

# Note: if is evil only in the location block

# If the request goes to /maintenance-mode ignore the maintenance mode
if ( $uri = '/maintenance-mode' ) {
    set $maintenance "${maintenance}+disable";
}

# Check if the maintenance mode is enabled
if (-f $document_root/maintenance-mode) {
    set $maintenance "${maintenance}+exists";
}

# If the request goes to anything different than /maintenance-mode return a 503 if the maintenance mode is enabled
if ( $maintenance = "+exists" ) {
    return 503; # Service temporarily unavailable
}

error_page 503 @maintenance;

location @maintenance {
    rewrite ^(.*)$ /maintenance.html break;
}
The /maintenance-mode location block contains directives which enable us to create or remove the /usr/share/nginx/html/maintenance-mode file over HTTP.
We can create the file with curl:
curl -i -u czerasz:password1234567890 -XPUT localhost/maintenance-mode -d ''Note
The-u czerasz:password1234567890parameter is responsible for authentication. We could also use this urlhttp://czerasz:password1234567890@localhost/maintenance-modeinstead.
Or we can delete the file with:
curl -i -u czerasz:password1234567890 -XDELETE localhost/maintenance-modeNote
We are using base authentication which should be improved by enabling SSL.
The existence of /usr/share/nginx/html/maintenance-mode tells Nginx if it is in maintenance mode:
- if the
/usr/share/nginx/html/maintenance-modefile exists then Nginx will respond with a503status code - the service is in maintenance mode - if the
/usr/share/nginx/html/maintenance-modefile doesn’t exists then Nginx works normally
If the /usr/share/nginx/html/maintenance-mode file exists, Nginx will return the /usr/share/nginx/html/maintenance.html file with the 503 status code for all requests. The specific status code is important because it tells Google and co that the service is temporarily unavailable. And that they should try it later. I refer to this article which explains why it is so important from the seo perspective.
The config contains also few if statements which allow us to do the DELETE request (which was discussed before) in maintenance mode.
Integration Tests
Now that we know how our configuration works, it’s time for a success experience. Let’s run our test suite and watch the tests pass:
$ ./bin/test.sh
Build the container
Remove the old container
Start the container and run the tests
1..6
ok 1 Nginx binary is found in /usr/local/libexec:/usr/local/sbin:/usr/local/bin:/usr/sbin:/usr/bin:/sbin:/bin
ok 2 Nginx is installed in version 1.7.9
ok 3 Upstream server shouldn't be available
ok 4 Nginx should be in maintenance mode if the /usr/share/nginx/html/maintenance-mode exists
ok 5 Allow the client to create the /usr/share/nginx/html/maintenance-mode file over HTTP
ok 6 Allow the client to remove the /usr/share/nginx/html/maintenance-mode file over HTTP
The analysis of our bin/test.sh helper script shows that it works according to this scenario/along those points:
- a Docker image is build based on the already discussed
Dockerfile - the previous, old container is removed, if it exists
- a new container is created based on our build
- in the newly created container, the
bats /nginx.batscommand is executed to run our tests - the
--rm=trueparameter tells Docker to remove our container after the tests have finished
We know that our tests pass, so let’s see how they are written. The test/nginx.bats file which represent our test catalogue, is a simple Bash script which uses the Bats testing framework:
#!/usr/bin/env bats

wait_for_nginx() {
  # Start Nginx
  nginx &

  while ! pgrep -xf "nginx: worker process" > /dev/null ;
  do
    echo 'wait for nginx'

    sleep 0.1;
  done
}

maintenance_file_path=/usr/share/nginx/html/maintenance-mode

teardown() {
  pkill nginx || true
  rm -f $maintenance_file_path &> /dev/null
}

@test "Nginx binary is found in $PATH" {
  run which nginx

  [ "$status" -eq 0 ]
}

@test "Nginx is installed in version 1.7.9" {
  run /usr/sbin/nginx -v

  [[ "$output" =~ "1.7.9"  ]]
}

@test "Upstream server shouldn't be available" {
  wait_for_nginx

  result="$(curl -Is http://localhost/ | head -n1 | awk '{print $2}')"

  [[ "$result" -eq '502' ]]
}

@test "Nginx should be in maintenance mode if the $maintenance_file_path exists" {
  wait_for_nginx

  touch $maintenance_file_path

  run bash -c "curl -s -w '%{http_code}' http://localhost/ -o /dev/null"

  [[ "$output" -eq '503' ]]
}

@test "Allow the client to create the $maintenance_file_path file over HTTP" {
  wait_for_nginx

  # Shouldn't be able to create the maintenance file without authentication
  run bash -c "curl -s -w '%{http_code}' -XPUT localhost/maintenance-mode -d '' -o /dev/null"

  [[ "$output" -eq '401' ]]

  # File shouldn't be created yet
  if [ -f "$maintenance_file_path" ]; then
    [[ 1 -eq 0 ]]
  else
    [[ 0 -eq 0 ]]
  fi

  # Allow with authentication
  run bash -c "curl -s -u czerasz:password1234567890 -w '%{http_code}' -XPUT localhost/maintenance-mode -d '' -o /dev/null"

  [[ "$output" -eq '201' ]]

  # Check if maintenance file was successfully created
  if [ -f "$maintenance_file_path" ]; then
    [[ 0 -eq 0 ]]
  else
    [[ 1 -eq 0 ]]
  fi
}

@test "Allow the client to remove the $maintenance_file_path file over HTTP" {
  wait_for_nginx

  touch $maintenance_file_path
  chown nginx:nginx $maintenance_file_path

  # Shouldn't be able to delete the maintenance file without authentication
  run bash -c "curl -s -w '%{http_code}' -XDELETE localhost/maintenance-mode -o /dev/null"

  [[ "$output" -eq '401' ]]

  # File shouldn't be deleted yet
  if [ -f "$maintenance_file_path" ]; then
    [[ 0 -eq 0 ]]
  else
    [[ 1 -eq 0 ]]
  fi

  # Allow with authentication
  run bash -c "curl -s -u czerasz:password1234567890 -w '%{http_code}' -XDELETE localhost/maintenance-mode -o /dev/null"

  # File should be deleted
  if [ -f "$maintenance_file_path" ]; then
    [[ 1 -eq 0 ]]
  else
    [[ 0 -eq 0 ]]
  fi

  [[ "$output" -eq '204' ]]
}
If you have basic Bash understanding you should be able to easily understand it but let me explain the most important parts.
The spec contains @test blocks, variables and functions.
The @test block has the following structure:
@test "Name of the test" {
  # The test goes here
  run /usr/sbin/nginx -v

  [ "$status" -eq 0 ]
  [[ "$output" =~ "1.7.9"  ]]
}
Inside the @test block we can run any command afterwards analysing its output and its exit code.
Note
A successful command returns a0, while an unsuccessful one returns a non-zero value.
In case of more complex commands I use a bash -c wrapper to encapsulate the entire command as presented in the example below:
run bash -c "curl -s -u czerasz:password1234567890 -w '%{http_code}' -XDELETE localhost/maintenance-mode -o /dev/null"Because we need to test a web server, what could be better than the curl command to achieve this task? The following parameters have proved to be very useful:
-s- silent mode. Don't output anything-w '%{http_code}'- return only the status code-XPUT- specify the request method-d ''- specify thePOSTrequest data-u user:password- specifies the user and password for the base authentication-I- show response status with headers
$ curl -I google.com
HTTP/1.1 302 Found
Cache-Control: private
Content-Type: text/html; charset=UTF-8
Location: http://www.google.de/?gfe_rd=cr&ei=uBo2VdWMAqSF8Qfex4DACA
Content-Length: 258
Date: Tue, 21 Apr 2015 09:39:04 GMT
Server: GFE/2.0
Alternate-Protocol: 80:quic,p=1
Bats has also some conventions. One of them is the teardown function, which is executed after each test case to clean up the environment. In our script the cleanup consists of killing Nginx and removing the /usr/share/nginx/html/maintenance-mode file.
You also noticed the wait_for_nginx function which is there to spin up the Nginx process and wait until it’s up. This code could be also wrapped inside the setup helper which is executed before each test.
You can read more about the teardown and the setup helpers here.
In summary our tests consist of Bash commands which are later analysed in Bash for their correctness.
Make sure you visit the Bats Github repository to star this awesome project.
Performance Considerations
Swapping the Nginx configuration file by a another configuration file that contains only the maintenance logic would save Nginx a lot of processing power. I can imagine this could be achieved with Ansible or Puppet fairly easy. But depending on your situation it might be harder to implement (than a HTTP request) and might also require an additional service/process which makes the architecture more complex. Read, compare features and decide.
