This article describes how to use Vagrant on a daily basis. I will introduce to you Vagrant's workflow routines and the most important and useful Vagrant commands.
Introduction
Vagrant is a helpful wrapper arround different VM providers. Vagrant is a very powerful tool and it is driven by simple workflows. And exactly those workflows are described in this article.
We will discuss five stages/phases which represent a typical Vagrant workflow/life cycle.
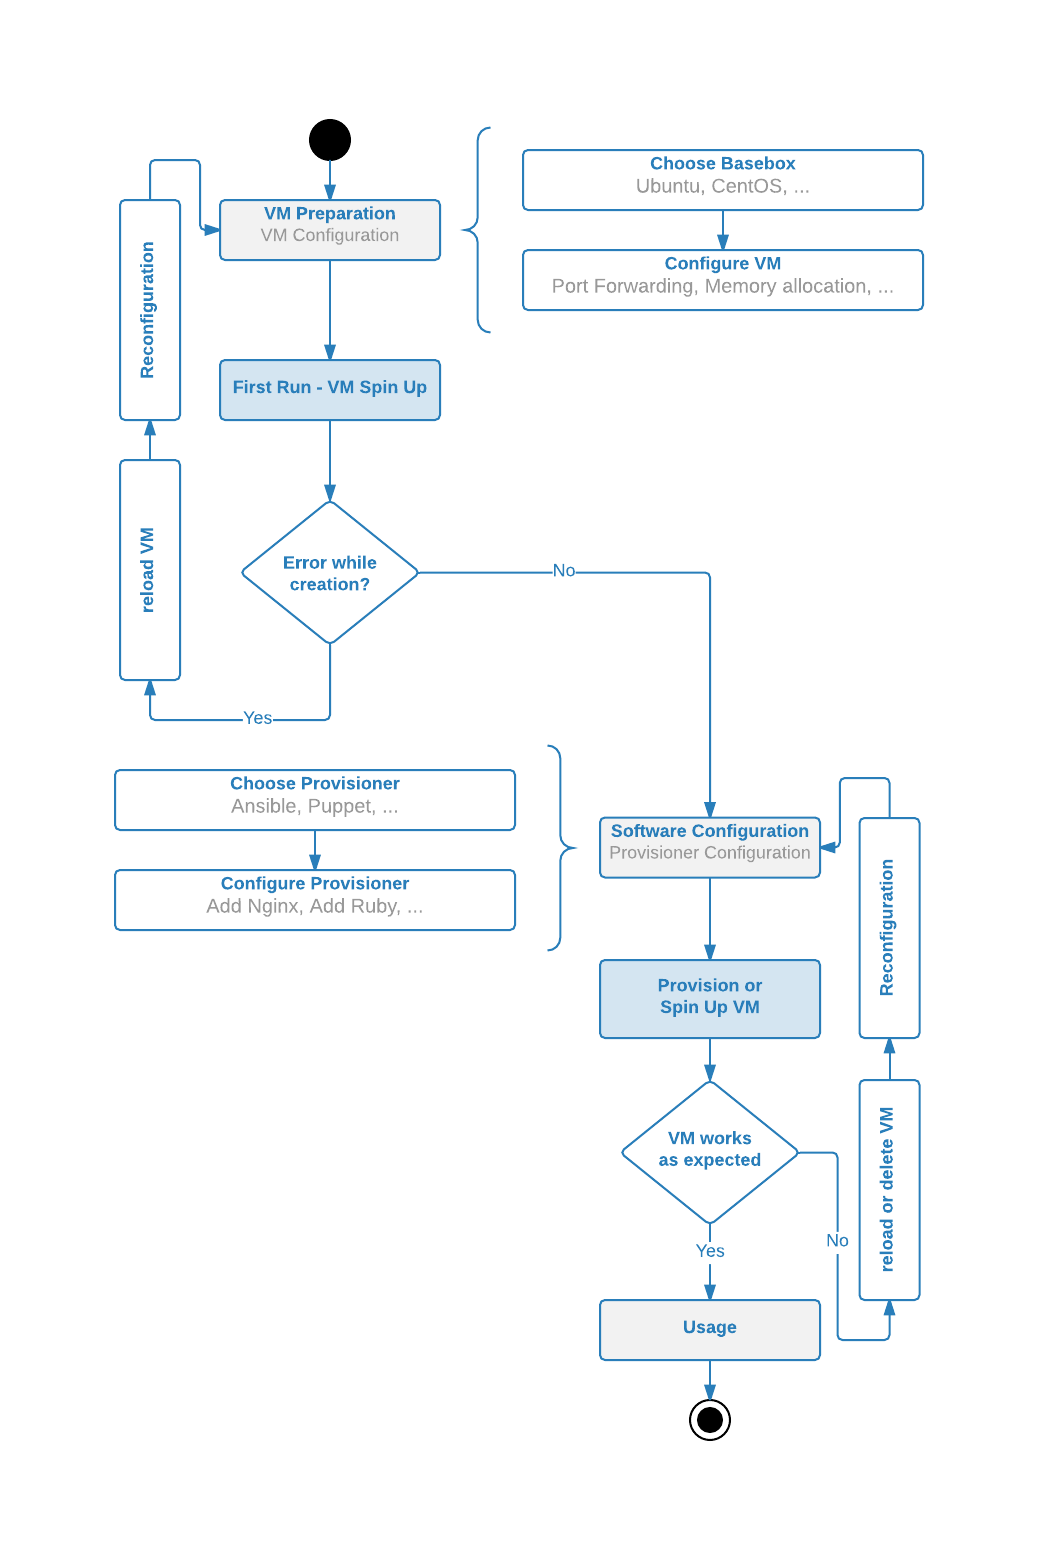
They are presented on the diagram below.
-
The first one is the VM preparation phase.
In this phase we need to choose the base box (operating system), configure network details, file sharing options, setup plugins, etc. During this phase we mainly work on the
Vagrantfilewhich is an configuration file, used by Vagrant to build our virtual machines. -
Then we move on to the second phase which is called the first run.
In this phase we spin up our virtual machines for the first time.
If during this phase we run into errors, we can be sure that those are related to the VM configuration itself or to the host system in which we are trying to run our VM’s. If this is the case we need to fix those issues and then reload the VM’s again.
-
The next step is the software configuration phase.
Together with the provisioning phase it is the most time consuming part.
Here we need to decide which technology we want to use to install software on our VM’s And after this decision is made we need to configure it so the VM has the software which is required.
Vagrant supports many popular provisioners like Ansible, Puppet, Chef, Salt.
-
After the provisioner is setup we continue with the provisioning phase.
During this phase Vagrant will install the software via the provisioner configured in the previous step.
-
The last phase is the usage phase.
In this phase we enjoy the fruits of the previous two steps - we use the VM’s to acomplish our actual goal.
Requirements
To be able to execute commands in the chapters below you need the following:
- Virtualbox or any other provider
- Vagrant
- On Ubuntu host install NFS (on Mac it's already there):
sudo apt-get install nfs-common nfs-kernel-server -y
Vagrant Life Cycle Phases in Detail
VM Preparation Phase
This is the first step so we need to prepare our VM requirements.
We should ask the following questions:
- which operating system do we want to use? Ubuntu, CentOS, CoreOS or maybe Gentoo?
- do we need port forwarding?
- do we need a static IP?
- how much memory does our machine need?
- do we need to expose any files from our VM?
When this is calified we start writing our Vagrantfile.
We can begin with creating a totally new, well commented Vagrantfile by executing the following command:
vagrant init ubuntu/trusty64Note
To get more information about the usedubuntu/trusty64base box click here.
Or just copy the the simple Vagrantfile provided below:
# -*- mode: ruby -*-
# vi: set ft=ruby :

# Vagrantfile API/syntax version. Don't touch unless you know what you're doing!
VAGRANTFILE_API_VERSION = "2"

Vagrant.configure(VAGRANTFILE_API_VERSION) do |config|
  config.vm.box = "ubuntu/trusty64"

  config.vm.network "forwarded_port", guest: 80, host: 8080

  config.vm.synced_folder "./shared", "/home/vagrant/shared", type: "nfs"
end
Note
You can get more base boxes from the official Vagrant repository, form the community repository or configure your whole environment with Puppet at puphpet.com.
Now that we have our simple Vagrant configuration we will start our first VM.
First Run Phase
The first run phase is the most important step because we need to make sure that the environment is setup correctly.
We can start our first VM with the following command:
vagrant upIf you used the Vagrantfile provided above you will experience the following issue:
$ vagrant up
Bringing machine 'default' up with 'virtualbox' provider...
There are errors in the configuration of this machine. Please fix
the following errors and try again:

vm:
* The host path of the shared folder is missing: ./shared
It’s easy to fix by creating a shared directory inside the directory which contains the Vagrantfile:
mkdir sharedAlthough this is an easy fix, it illustrates that when an error occured during the first run phase we need to reload or even start our VM’s again - like presented in the Vagrant workflow phases diagram.
A good way to say either we need to start or reload, is to check the status by using the vagrant status command, as in the example below:
$ vagrant status
Current machine states:

default                   not created (virtualbox)
...
In our case the VM was not created at all so we need to start it again:
vagrant upThis time we should get the following issue:
$ vagrant up
Bringing machine 'default' up with 'virtualbox' provider...
==> default: Importing base box 'ubuntu/trusty64'...
==> default: Matching MAC address for NAT networking...
==> default: Checking if box 'ubuntu/trusty64' is up to date...
==> default: Setting the name of the VM: vagrant-test_default_1420393989632_21390
==> default: Clearing any previously set forwarded ports...
==> default: Clearing any previously set network interfaces...
==> default: Preparing network interfaces based on configuration...
    default: Adapter 1: nat
==> default: Forwarding ports...
    default: 22 => 2222 (adapter 1)
==> default: Booting VM...
==> default: Waiting for machine to boot. This may take a few minutes...
    default: SSH address: 127.0.0.1:2222
    default: SSH username: vagrant
    default: SSH auth method: private key
    default: Warning: Connection timeout. Retrying...
    default: Warning: Remote connection disconnect. Retrying...
    default:
    default: Vagrant insecure key detected. Vagrant will automatically replace
    default: this with a newly generated keypair for better security.
    default:
    default: Inserting generated public key within guest...
    default: Removing insecure key from the guest if its present...
    default: Key inserted! Disconnecting and reconnecting using new SSH key...
==> default: Machine booted and ready!
==> default: Checking for guest additions in VM...
NFS requires a host-only network to be created.
Please add a host-only network to the machine (with either DHCP or a
static IP) for NFS to work.
It turns out that when a direcotry is shared over NFS (and that is our case), we need to assign an static IP to our VM.
This can be easily achived by adding the following line to the Vagrantfile:
config.vm.network "private_network", ip: "192.168.33.11"This time we will just reload our VM because vagrant status shows that it was already created:
$ vagrant status
Current machine states:

default                   running (virtualbox)
...
Reloading the VM can be achieved with the following command:
vagrant reloadNow the first run phase is complete. Our VM has a basic configuration and it is up and running.
We can summarize this chapter with this diagram:
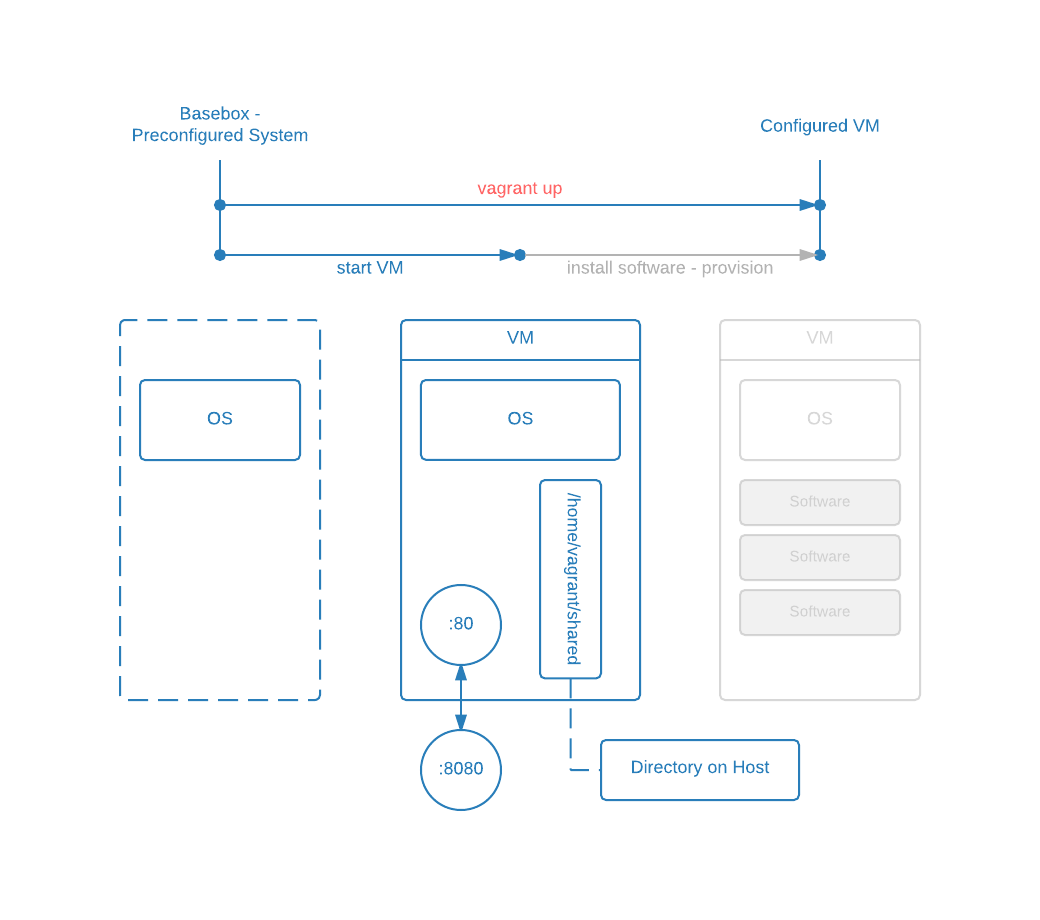
Please note the shaded element on the right side of the diagram above. By executing vagrant up for the first time, vagrant will also trigger the provisioning process. But because we didn’t configure it yet it will not run - that’s why it’s makred it as disabled.
But heads up, we will continue with the provisioning phase in the next chapter.
Provisioner Configuration and Provisioning
The provisioning process often described as configuration management is my favourite part.
It takes a lot of time to do it right but it adds a lot of value to the virtual machine - it describes the VM’s role. Specially the software installation (provisioning) part is very time consuming and sometimes requires a lot of tweaking.
To minimize frustration and wasted time I recommennd to use the Vagrant cachier plugin which is described in detail in this blog post.
By using Vagrant we can choose from many technologies starting from simple shell scripts to more abstracted ones like Ansible or Puppet. You can find a full list of supported Vagrant provisioners here in the Vagrant documentation.
In this chapter we want to achieve the Configured VM state presented on the diagram below - we want to install/update software on our previously created virtual machine.
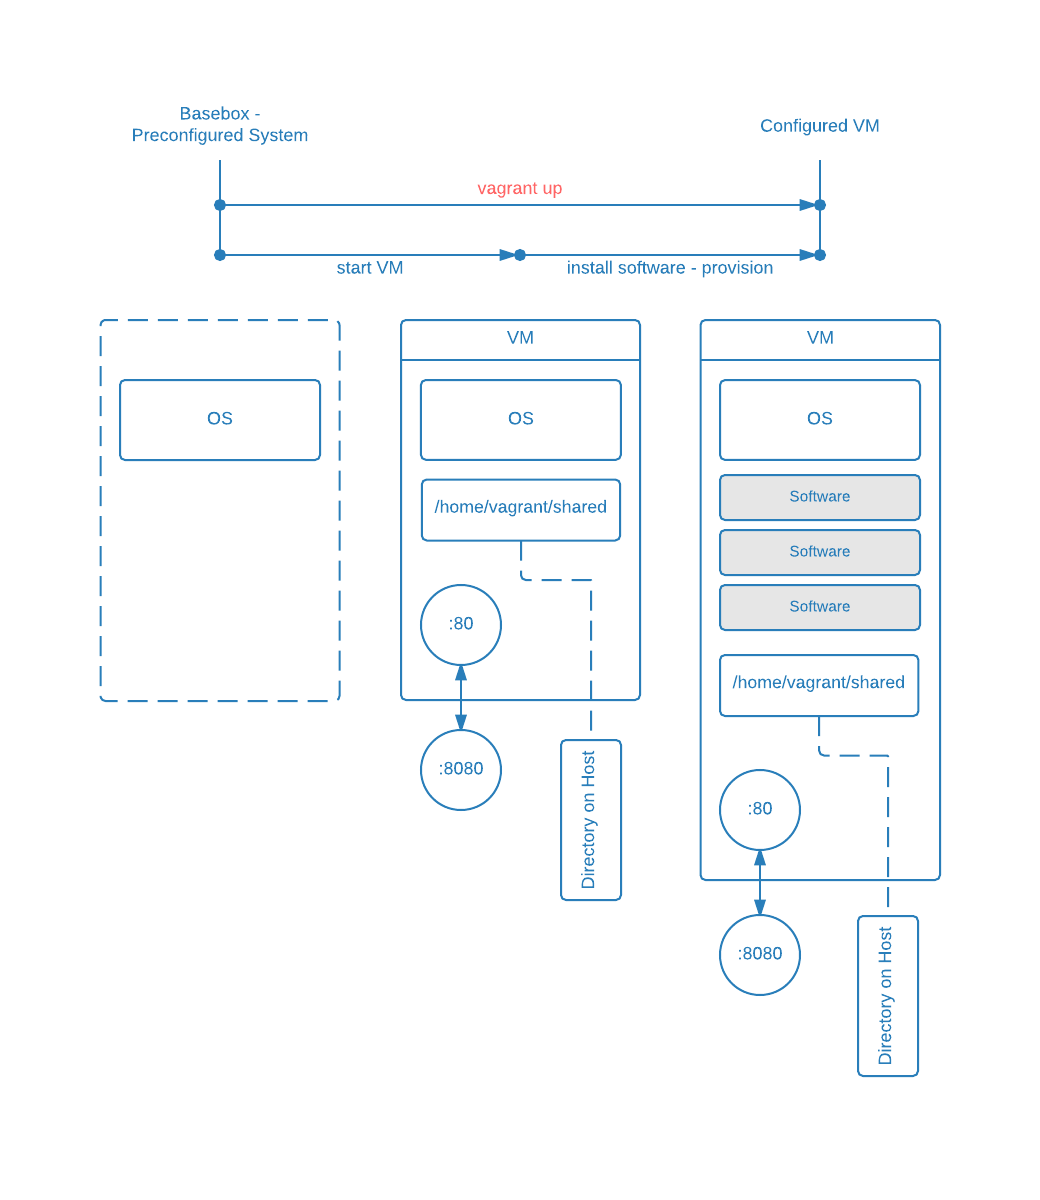
As an example we will add a simple shell script which updates Ubuntu on every start (or provisioning) but just once a month.
First let’s tell vagrant to use a shell script to provision our VM. Add the following line to the Vagrantfile:
config.vm.provision "shell", path: "provisioners/shell/update.sh"We will also need an update.sh file located under provisioners/shell/ in our project directory. It’s a good convention to keep each provisioners configuration in a separate directory. That way things are always organised.
Now let’s look at the update.sh itself:
#!/bin/bash

# Update the system once every month

#@BEGIN: SYSTEM UPDATE SCRIPT
HOSTNAME=`hostname`
DATE_FILE=/vagrant/provisioners/shell/.last-system-update-$HOSTNAME.date
NOW=`date +"%Y%m"`

# Check if the $DATE_FILE exists
# This file stores the date of the latest update
if [ ! -f $DATE_FILE ]; then
  # $DATE_FILE file was not found

  # Write the current date into a temporary file
  echo $NOW > $DATE_FILE

  # Update system
  apt-get update --fix-missing
else
  # Get the date of the last update
  LAST_UPDATE=`head -n 1 $DATE_FILE`

  # Check if update was done in the last month
  # Used only for testing purposes
  # LAST_UPDATE=$(( $LAST_UPDATE - 1 ))

  # If update was done at least two months ago do it again
  if [ $LAST_UPDATE -lt $NOW ]; then
    # Write the current date into a temporary file
    echo $NOW > $DATE_FILE

    # Update system
    apt-get update --fix-missing
  else
    echo "The system updates only once a month"
  fi
fi
#@END: SYSTEM UPDATE SCRIPT
The script checks if an “update file” for the current VM already exists in the /vagrant/provisioners/shell/ directory. If it exists then it will check the date inside. If the file doesn’t exist or the date is older than a month then the script will perform a system update.
Note
The directory which stores theVagrantfile(the project directory) is automatically mounted under/vagrant/on the VM.
The update script above is pretty straightforward and hopefully well documented. But keep in mind that you need to remove provisioners/shell/.last-system-update-* each time after the VM’s was destroyed. Remember also to put provisioners/shell/.last-system-update-* to .gitignore.
Finally we can apply our software updates by executing vagrant provision. The outcome are debug messages like those presented below and an updated Ubuntu on the VM:
$ vagrant provision
==> default: Running provisioner: shell...
    default: Running: /tmp/vagrant-shell20150106-13476-l2dxvx.sh
==> default: stdin: is not a tty
==> default: Ign http://archive.ubuntu.com trusty InRelease
==> default: Ign http://security.ubuntu.com trusty-security InRelease
...
==> default: Ign http://archive.ubuntu.com trusty/universe Translation-en_US
==> default: Fetched 9,249 kB in 18s (487 kB/s)
==> default: Reading package lists...
It often happens so that during the provisioning process something goes wrong. In this case you need to go back to the preparation phase, adjust the configuration and then depending on your changes and the provisioner, execute vagrant provision or vagrant destroy; vagrant up.
You might ask why should I use vagrant destroy; vagrant up? Why should I destroy my VM and build it from the scratch?
Again as mentioned above: it depends on Your changes, used provisioner or even team structure. The reason why you would like to destroy your VM and then build it from the scratch is the confidence that when somebody new wants to build it he won’t face any troubles.
Usage
In this phase we use the VM to achieve our business goal.
We can login to the machine with:
vagrant sshAfter we are logged in, we can mess arround and destroy everything we like, without worring too much. We are relaxed because we know that the VM can be recreated anytime, anywhere.
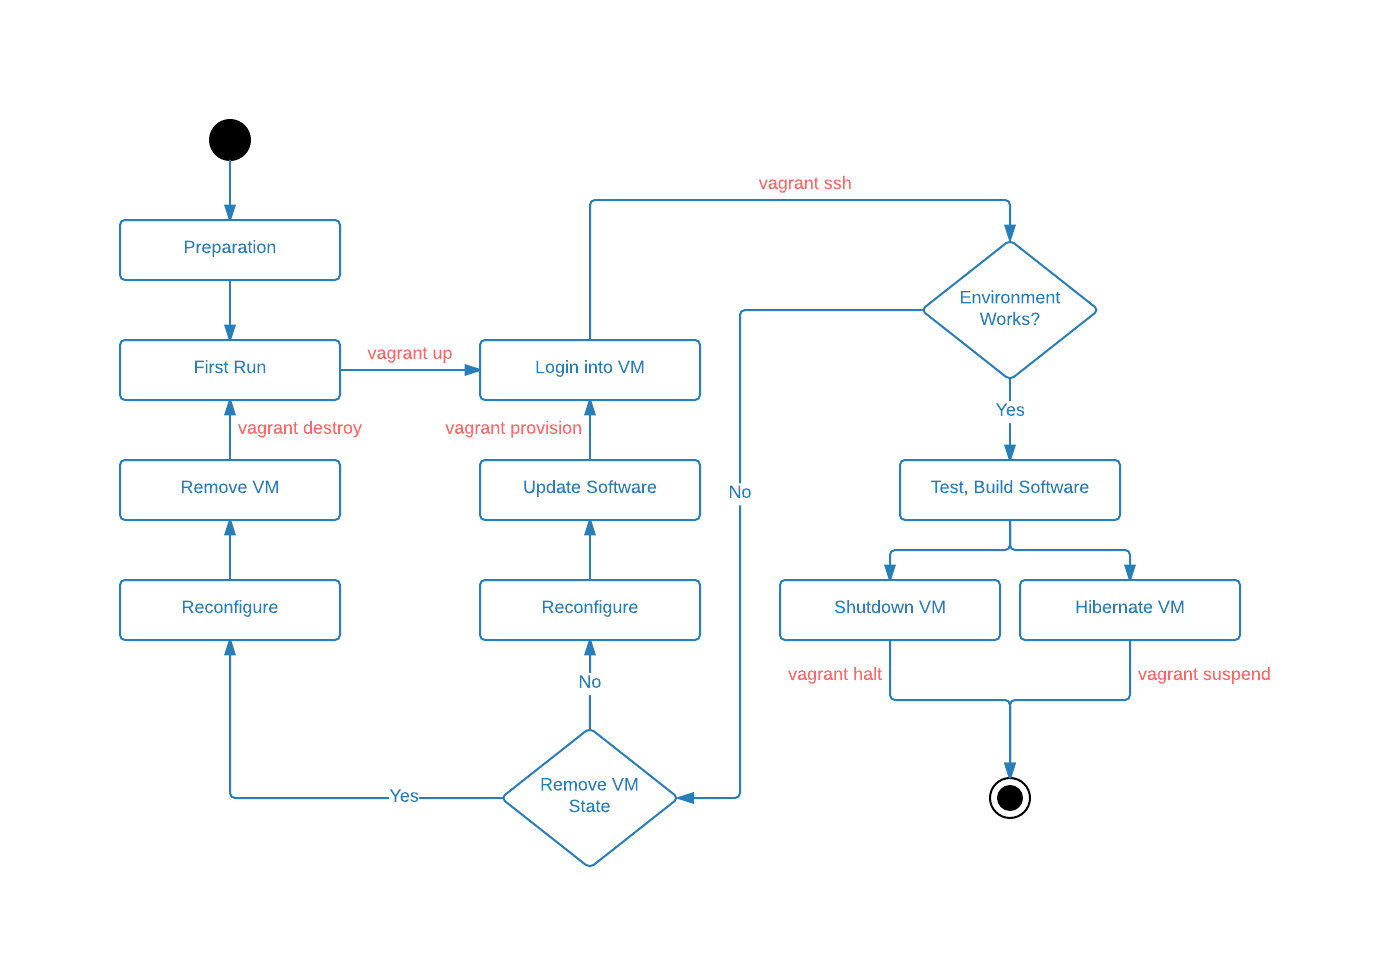
Vagrant Command Workflow Overview - Bonus
For those of you who are tough enough and reached the end of this article I prepared a bonus in form of a Vagrant life cycle diagram. It represents which command can be used during each phase of the Vagrant life cycle. Enjoy!